Labelling for Semantic Segmentation
When training a semantic segmentation model, you will often need to do some labelling first. This guide covers some of the features common to labelling for semantic segmentation. You can use either the polygon tool, which lets you manually draw polygons around features, or the auto-segment tool, which allows you to click a point inside a feature and it automatically creates a polygon that matches the visual boundary of that feature. Both are covered below.
- Navigate To The Assessment Editor
- Draw A Polygon Manually
- Draw A Polygon Using Auto-Segment
- Use Best Practices
- Avoid Common Issues
Navigate To The Assessment Editor
When you first log in to Highlighter, you should see your assessment dashboard. If not, click the 'Assess' link in the top navigation. Click the button in the main pane that says 'Start Task' or 'Continue Task'. This will take you to the Assessment Editor to start work. You will see this button if you have been assigned a work queue. If you don't see it, please contact your Highlighter project manager.
Draw a Polygon Manually
- Select the Polygon tool.

- Select the desired class from the Object's menu
- Click to set vertex of the polygon
- Continue to click to add more points
- Hit "Enter" to close the Polygon
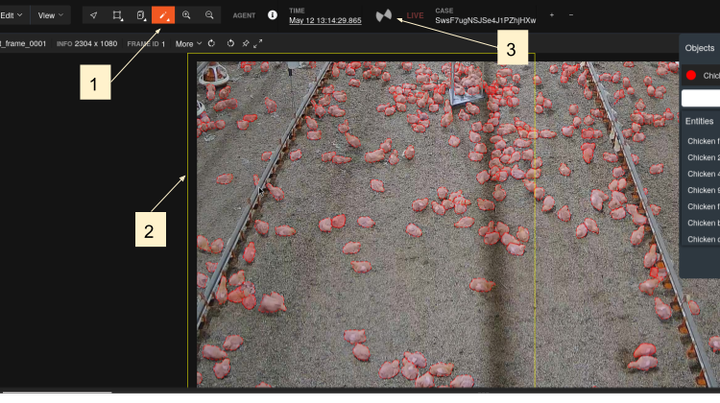
Draw a Polygon Using Auto-Segment
- Select the Auto-Segment tool.

- A yellow box will appear. It shows where the AI is "looking", the area of the image that the auto-segment tool analyses to find objects. Pan and zoom to position the yellow box across the part of the image you want to find features within. Note: To pan, click outside the bounds of the image.
- Click a feature within the yellow box. The first time you do this, the AI will take some time to process that area, and the spinner will appear in the top toolbar. Once complete, it will then create a polygon matching the outlines of the feature. After that, if you don't move the yellow box, the following clicks will be much quicker. If you move the yellow box, the first click will take some time again.
- Continue clicking features within the yellow box. If you make a mistake or the tool doesn't find the feature you expect, hit the delete key to remove the polygon, or click the bin icon next to the highlighted Entity in the right panel. You may need to select the polygon you want to delete again - just change to the pointer tool, click the polygon, then delete it as described.
Use Best Practices
- Precision: Trace object boundaries as accurately as possible to avoid mislabeled pixels.
- Consistency: Apply the same labeling criteria across all images (e.g., consistent class definitions).
- Clarity: Consult guidelines or a supervisor for ambiguous regions or objects.
- Efficiency: Work systematically, prioritizing quality over speed.
Avoid Common Issues
- Inaccurate Boundaries: Ensure masks align with object edges, avoiding gaps or overlaps.
- Incorrect Labels: Verify the class for each region before saving.
- Missed Regions: Ensure no objects or areas from the class list are overlooked.
- Overlapping Masks: Avoid assigning multiple classes to the same pixel unless specified.